
In this article, we’ll provide you with a comprehensive guide to fully optimize your product listing for 2024. With Amazon Listing Optimization, you can drive more traffic and increase conversion rates.
Is your product not performing as well as you’d hoped after launching? Or maybe your product has been on Amazon for a while and needs a little revamping.
No matter what your situation is, this 45-point checklist is going to help you fully audit your Amazon marketing and detail page to give your product the boost it needs.
If you go through this checklist step by step, it’s virtually guaranteed that you will start making more money on Amazon.
Let’s get to it!
Basic Amazon Readiness for Listing Optimization
This section covers the absolute bare minimum you need to do for your product on Amazon.
If you haven’t done these things it’s going to be almost impossible to make money on Amazon.
So, be sure you understand each one.
Step 1: Do You Have Inventory?
First things first, make sure you actually have product to sell.
Ok, I know…Duh! But if you don’t have any stock nothing else matters. So make sure you have inventory.
How can you check this?
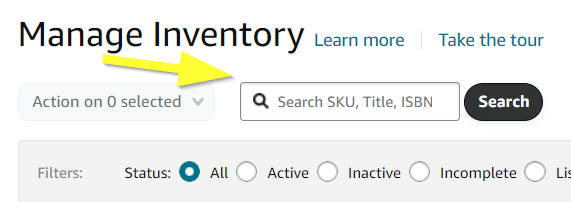
Go to your Seller Central and click “Manage All Inventory”.
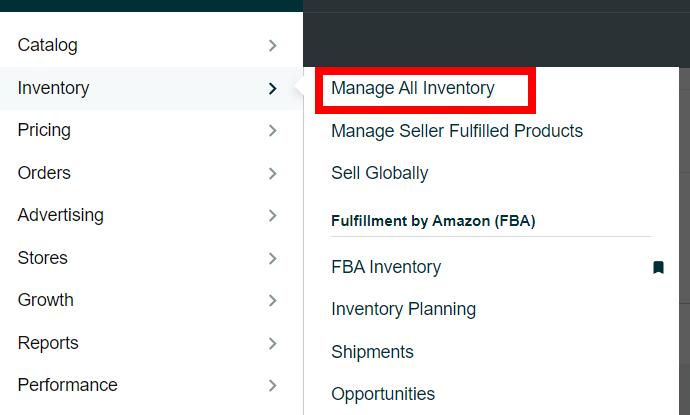
From there, simply type in your product name, SKU or ASIN.
If you use FBA then you’ll see this data.
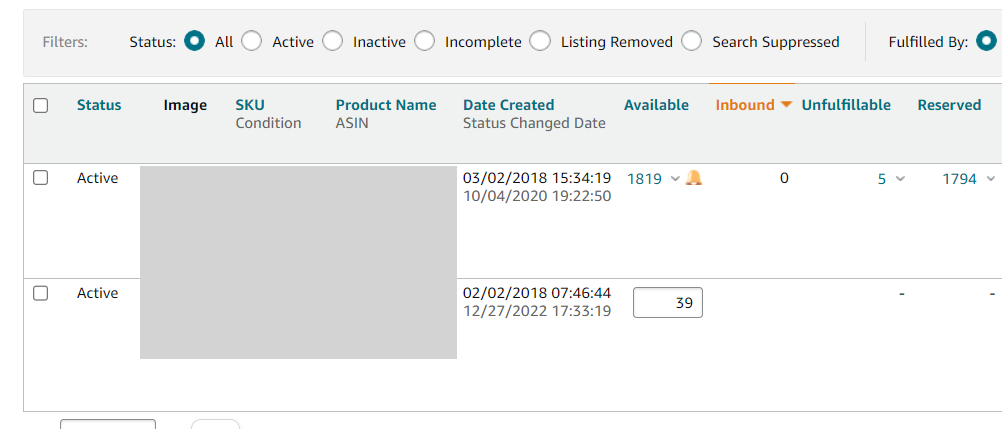
Here’s what each item means…
Available: Units that are available to ship out to customers from FBA.
Inbound: Units that are on the way to FBA.
Unfulfillable: Units that Amazon has determined cannot be sold. Usually due to damage or some other defect.
Reserved: Units that have been ordered and are waiting to be shipped out.
Step 2: Is Your Product Actually Live on Amazon?
This might seem like a no-brainer but when was the last time you actually checked to see if your listing was live on Amazon?
Maybe something went wrong with the upload. Or maybe it’s search suppressed for some reason.
You never know.
To check this, simply go to the search bar in Amazon and type in your ASIN.
If your product shows up in the search results, you’re good to go.
You can also check this in the same inventory menu mentioned in step one.
If not, you’ll need to investigate further which leads to the next step.
Step 3: Check for Listing Alerts
If your listing isn’t live, one reason might be that it has a listing alert. To check for this, head back over to your inventory page and check the “Status” column.
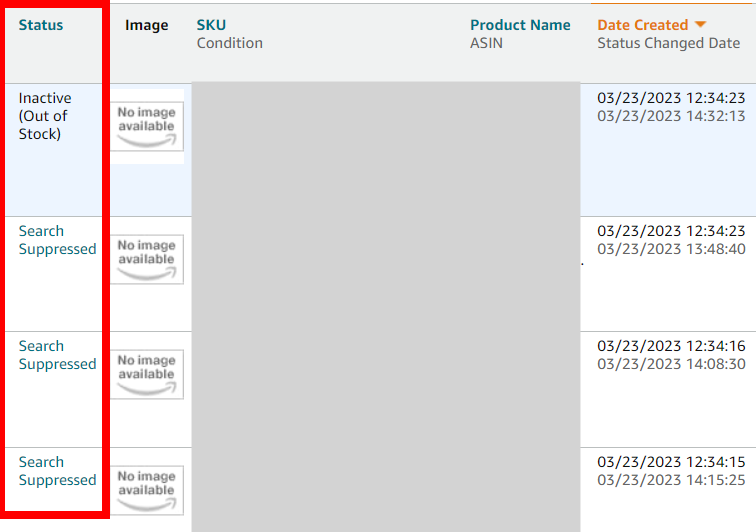
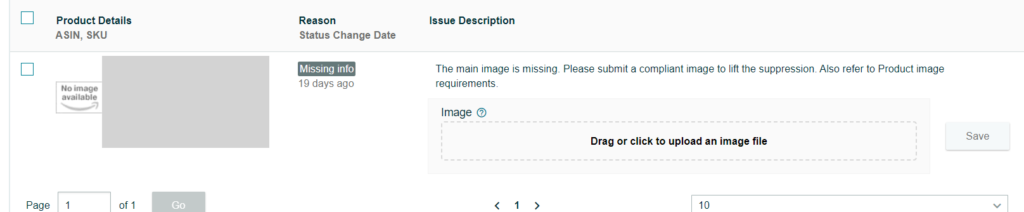
If there is a listing alert, click on the status to get more information.
You’ll be taken to a page like this where you can see the reason for the alert.
To go even further you can also look for problems at the account level which we’ll cover in the next step.
Step 4: Check Your Account Health
Your account health on Amazon should always be a top priority but it’s especially important to pay attention to it when trying to diagnose product listing issues.
To see your account health rating in Seller Central, simply scroll down to the bottom of the webpage and click on “Account Health”.

From there you’ll be able to see a full breakdown of any potential issues. If there’s something you need to troubleshoot, you’ll likely need to open a case with Amazon customer service.
Step 5: Look at the Product’s Sales History
If you don’t know how your product usually performs then how can you know if it’s doing good or bad at any given time?
Tracking sales metrics is super important and there are lots of different ways to do it.
We track everything in Google Sheets because, well, it’s free! Plus it’s totally customizable.
If you’re not tracking things outside of Amazon though, there are reports you can download to help with your analysis
A good place to start is in “Business Reports”.
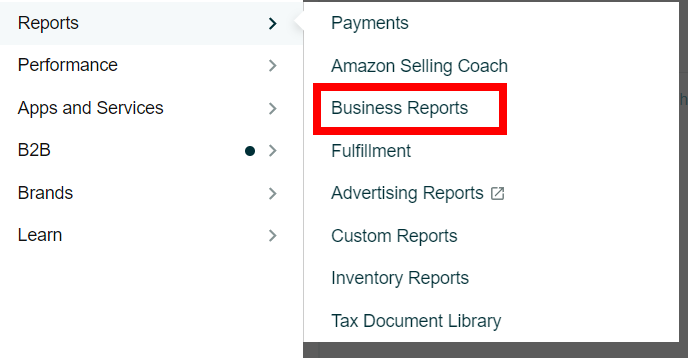
There are several reports available but we recommend looking into the “By ASIN” reports when it comes to doing sales analysis on an individual product.

Step 6: Start Taking Notes
At this point, it might start to get difficult to remember exactly what actions you’ve done on your product.
When was the last time you re-stocked? Or when did you last update your product images?
We recommend keeping lots of good notes with the date on when you made changes and what those changes were.
For example, maybe three months later you see a dip in sales. Instead of going through all of these steps again you can look back at your notes to see what the problem was last time and start there.
It can be a big time saver.
We keep all of this info in, you guessed it, a Google Sheet.
Step 7: Is Your Product Actually Profitable?
Again, this might sound silly but you’d be surprised how many folks out there don’t actually know their cost of goods sold (COGS) for their product.
Without this critical information, you might be losing money on each sale. Yikes!
So how can you calculate your COGS?
It’s simple. You just need to add up all of the costs associated with getting your product ready for sale. Things like…
- Manufacturing the Product
- Packaging the Product
- Shipping to You
- Customs and Tariffs (if applicable)
- Shipping to FBA or to Your Customer
Let’s say you sell sponges like the ones below. Here’s what you COGS breakdown might look like.
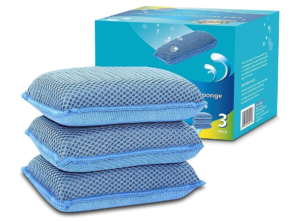
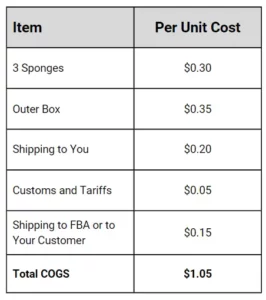
So if you sell your box of sponges for $9.99 that means you’re making $8.94 in profit per box, right?
COGS isn’t the only thing you’ll need to check in order to make sure your product is actually profitable.
Not exactly…
You’ll also need to see how much money you’re donating to Daddy Bezos.

Step 8: Check Your FBA and Referral Fees
Amazon takes a cut of all your product sales in the form of “referral fees” and if you use FBA to ship there is also a fee for that.
You’ll need understand both of these to ensure your product is actually profitable.
To check this, head back to your inventory page in Seller Central.
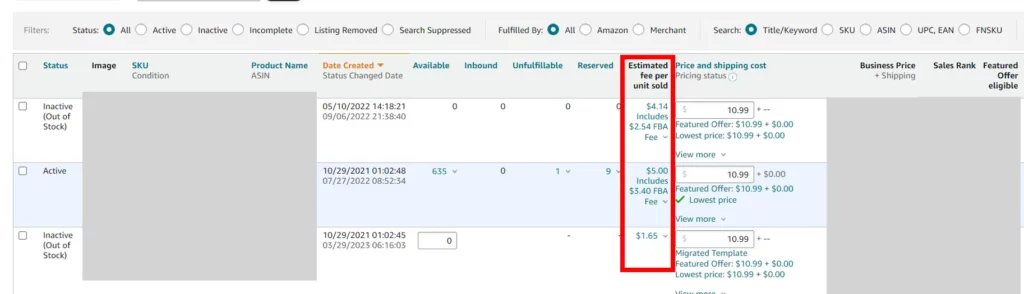
In the “Estimated Fees” column you’ll see two numbers.
The first number is the referral fee and the second is the FBA fee.
So, if we stick with our sponge example, let’s break it all down.
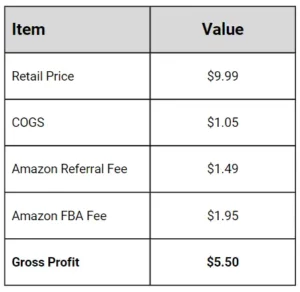
So at the end of the day you’re taking home $5.50 per unit in this example.
Not bad but remember that’s before any marketing expenses. We’ll get to that later.
Step 9: Do You Have the Buy Box?
Ahh, the coveted buy box. Often talked about but not always understood.
The buy box is what a customer sees on the Amazon website while their shopping.
It looks like this.
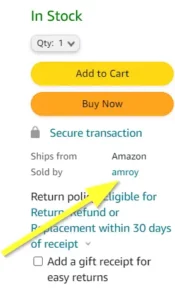
If your brand name is listed in the “sold by” section, then you have the buy box.
When you “have the buy box” that means that your product, not your competitor’s, is what the customer actually buys.
Since there are likely lots of sellers on Amazon selling the same product as you, Amazon will choose which seller “wins” the sale.
So even if a customer clicked on your product listing page, your competitor might still get the sale if they have the buy box.
If you don’t have the buy box, there are a few reasons why this might be the case.
- Your price is too high.
- Your product is out of stock.
- Your review rating is too low.
Let’s talk about pricing in more detail.
Get your Pricing Right with These Tips
There are a lot of factors that will lead an Amazon customer to make a purchase.
The biggest factor, arguably, is price.
According to Digital Marketing Community, in 2019 and 2020 Amazon customers rated price as the #1 factor in their buying decision.
So it’s really important to make sure that you’re pricing your product competitively.
Let’s look at the details…
Step 10: Check Your Competitor’s Prices
In order to price your product well, you’ll need to understand what your competitors are doing.
There are a couple of ways to do this:
- Whip up a Google Sheet
Go to Amazon and find around 10-15 of your competitors and add them to a Google Sheet along with their price. That way you’ll be able to get a good idea of the market prices.
- Consider a Tool Like Helium 10 Market Tracker
This tool will basically create a spreadsheet for you with competitor pricing and lots of other information.
Now you should have an idea of what other people are pricing their products at so you can make sure you’re in the ballpark.
Step 11: Run Some Experiments
Just because a certain price works for your competitor, though, doesn’t always mean it will work for you.
To hone in on the most optimal price for your product, you’ll need to run some experiments.
What that looks like is basically adjusting your price up and down and then seeing what effect this has on sales.
Here are a few additional tips…
- Once you change the price, give it time. Wait at least 7-10 days to see the effects before drawing any conclusions.
- Don’t make other changes while you run the experiments. If you also change your main image at the same time you change the price, you won’t know which action had an effect.
- Track your changes. Make sure you keep good notes on when you changed the price and to what so you can compare it with your sales data.
Step 12: Consider Business Pricing
What is business pricing on Amazon?
Amazon business pricing is available to Amazon Business customers who have access to business-only pricing. This is only available on certain items.
Who should use business pricing?
Any Amazon seller that sells products that might be used by other businesses should consider adding business pricing for their products.
What are the benefits of Amazon business pricing?
Some of the benefits of adding business pricing are….
- Increased sales: By offering business pricing, you can attract a new customer base of businesses that may require your products in larger quantities. This can lead to increased sales and revenue for your business.
- Improved customer loyalty: Businesses that purchase products in bulk are likely to become loyal customers if they are satisfied with your products and pricing. By offering business pricing, you can build stronger relationships with your customers and increase customer loyalty.
- Enhanced brand reputation: Offering business pricing can help enhance your brand reputation by showing that your business is able to cater to the needs of both individual consumers and businesses.
Create High-Quality Product Images
Besides the product price, images have a big influence on the customer buying decision.
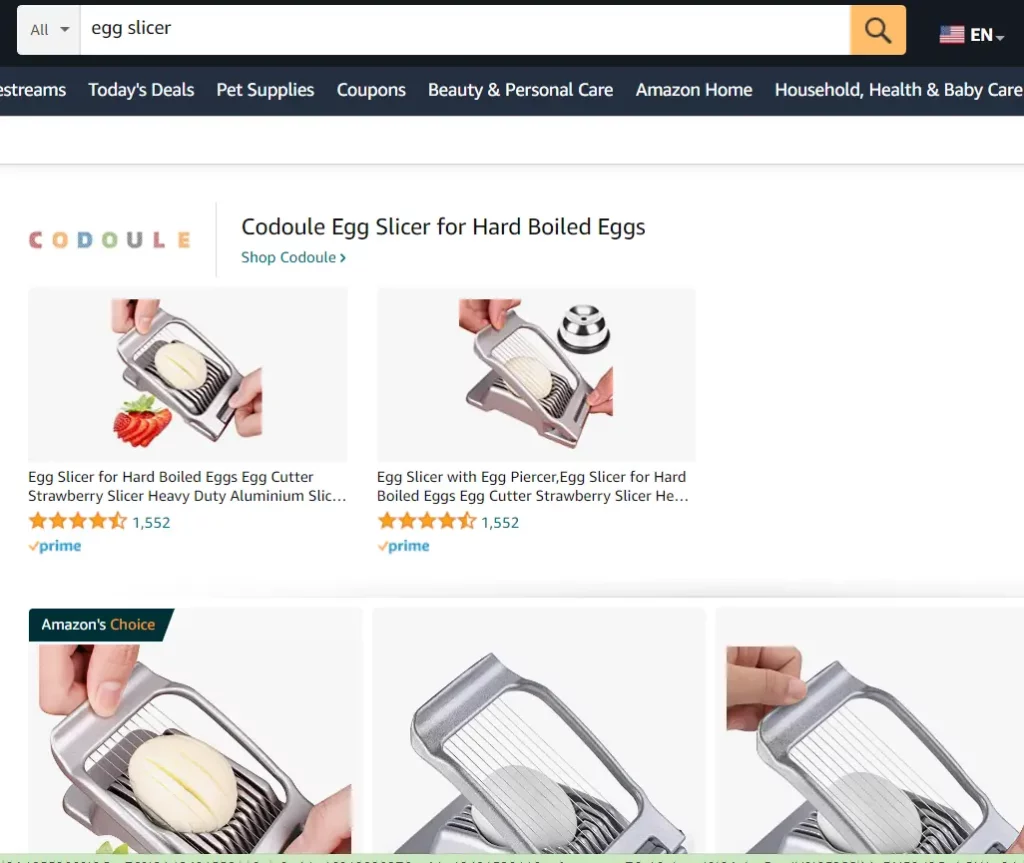
Let’s say you’re in the market for an egg slicer so you search for it on Amazon.
Here are a few of the products that might pop up. Which of these images draws your attention first?
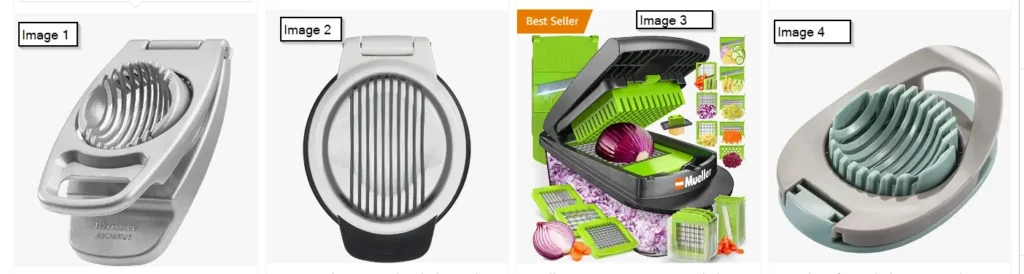
Clearly Image #3 is way more interesting and enticing. I mean just look at all that color and all of the different add-ons!
We’ll talk more about main image optimization later.
Now, let’s say for whatever reason you decide to click image 1 instead.
Here’s what you’ll see.
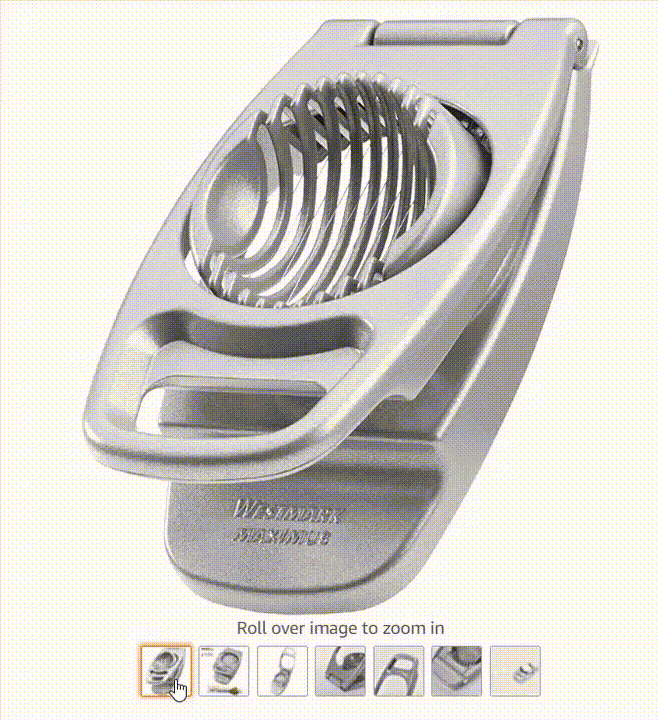
Are you sleeping yet?
Now how about the product in image 4?
.gif)
I mean, I didn’t even want an egg slicer before but I kind of want this crazy contraption!
Yes, these are arguably different products that serve different needs but it does illustrate the power of images.
Let’s keep going through the checklist.
Step 13: Are Your Images Compliant?
First things first, you need to make sure that your images are compliant and not violating any of Amazon’s policies.
To review Amazon’s image policies you can head over to “Image Issues” or “Product Image Requirements” in your Seller Central account.
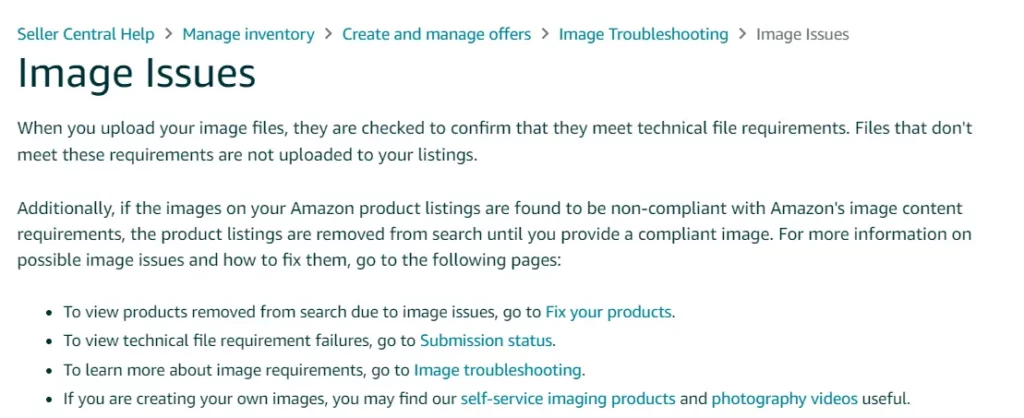
There you’ll find a handy table that breaks everything down. Like this…

Step 14: Get an Awesome Main Image
As you saw in the egg slicer example, your main image is the most important image in your listing.
Why?
If your main image sucks no one is going to click on your product. Pretty simple.
So what makes a great main image?
eComengine has a great article that breaks down exactly what you need to get an awesome main image.
If you’re going to be doing the photography yourself, check out Awesome Dynamic’s in-depth guide on doing a photoshoot.
Step 15: Tell a Story With Your Images
Unfortunately, people just don’t take the time to read every little detail of your product listing page.
So, as much as you possibly can, you’ll want to say it with pictures.
That means utilizing diagrams, infographics and short captions wherever possible.
The slicing product from earlier does a good job of that.
For example, they show the sizes of the different foods that can be chopped with their different blades.
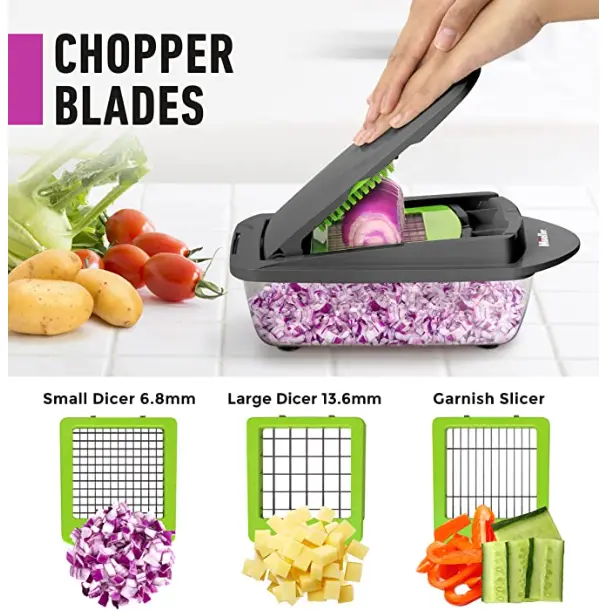
When you have limited time to convert a customer, it’s going to be better to show rather than tell.
Best Practices to Fully Optimize Your Amazon Listing Copy
Up next is the copy in your listing or the actual text. It can be broken down into three main sections.
- Title
- Bullet Points
- Product Description
Each section has a slightly different function and requires a slightly different optimization approach.
Let’s get into it.
Step 16: Figure Out What You’re Really Selling
Before starting your keyword research process, first you should take the time to figure out what you are really selling.
You might be thinking, “Well I’m selling a sponge…duh”.

I get it but let me explain.
You’re not really selling a sponge, you’re selling…
- A cleaner house
- The peace of mind that the sponge won’t tear apart during tough cleaning jobs
- Someone’s time that they don’t have to spend going to the store over and over to replace their sponges.
Write out these ideas so that when you go to do your keyword research you can refer back to it.
Step 17: Keyword Research Basics
This is the most impotant step of copywriting.
Missing even one keyword could mean you’re missing out on thousands of dollars in revenue over the lifetime of the product.
All three sections of the product listing, from the title to the description, will require careful keyword research.
We go through this process in more detail in our basic Amazon keyword research article.
You’ll want to put your most relevant and highest search volume keywords in the title, then the bullet points and finall the product desription.
Step 18: Crafting the Perfect Product Title
Again, you’ll want to assume that most people are just going to be skimming the copy on your product listing page. So, you’ll want to capture their attention with the most important feature of your product in your title.
And you’ll want to do that within the first 55 characters of your title.
The reason for that is because only 55 characters show up on mobile.
This is also known as “the hook.”
Some examples of a 55-character hook for the sponge product we talked about earlier might be:
- Effortless Cleaning, Durable Sponge
- Ultimate Clean, High-Quality Sponge
- Versatile Sponge, Cleans Every Surface
- Long-Lasting and Effective Sponge
- Gentle Sponge, Tough on Dirt
Finally, you’ll want to make sure that every single character is optimized based on your keyword research. You’ve got 200 characters total to work with in your title and you’ll want to make sure you’re utilizing all of that valuable real estate.
Step 19: Run an A/B Test On Your Title
Don’t forget to test your assumptions.
Even if you’ve come up with a great hook and title you’ll still want to run some A/B testing within Amazon to see what works best with your audience.
To do that, go to “Manage Experiments” within Seller Central.
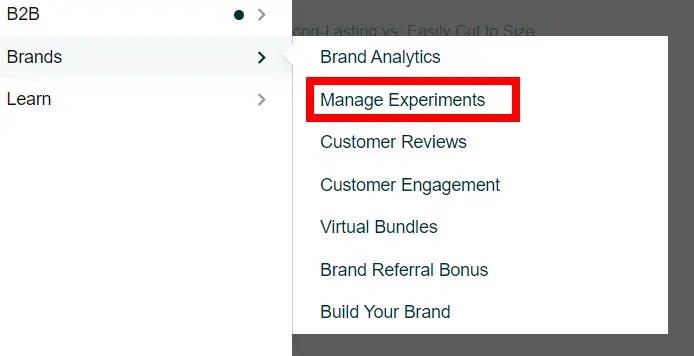
You have a few different options for things you can test. To test your product title, click on that.
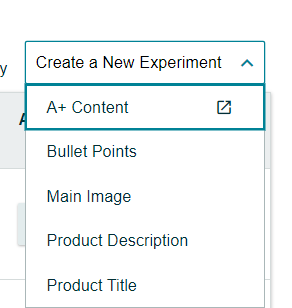
From there you’ll be guided to set up your experiment.
Step 20: Create Bullet Points That Sell
The next part of your product listing page are your bullet points.
This is where you’ll add the top five best features of your product.
Each bullet should have a lead-in that is easy to read and understand. You have about 250 characters total per bullet to fill things in based on your keyword research.
Here’s an example of a great bullet point from the egg slicer listing.
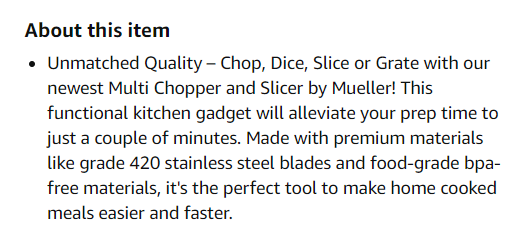
You can see they’ve got their lead in “Unmatched Quality” and then they go on to explain why the quality is great like the stainless steel blades and bpa-free materials.
Step 21: Don’t forget Your Product Description
Your main focus in this section is to include any additional features and benefits for your product that didn’t make it into the top 5 bullet points.
You’ve still got another 2,000 characters to pack in any other info and keywords you didn’t get to in your bullet points.
Like seriously, get in every single keyword you possibly can while still making it flow smoothly.
Set Up Your PPC Campaigns to Maximize Profitability
Alright, now that you’ve tackled your listing it’s time to get the word out about your product.
One proven way to do that is with Amazon PPC. Which, is our specialty of course.
Step 22: Learn the Foundations of PPC
Before setting up campaigns will-nilly you owe it to yourself to get educated. Otherwise, you risk making some very expensive mistakes.
We’ve got a FREE course on Amazon PPC with tips for beginners to advanced marketers that would be a great place to start.
Step 23: Understand Keyword Farming
As our name suggest, we are pretty into farming. Keyword farming that is.
What exactly is keyword farming in Amazon PPC?
We explain our full PPC farming process in this article but here it is in a nutshell.
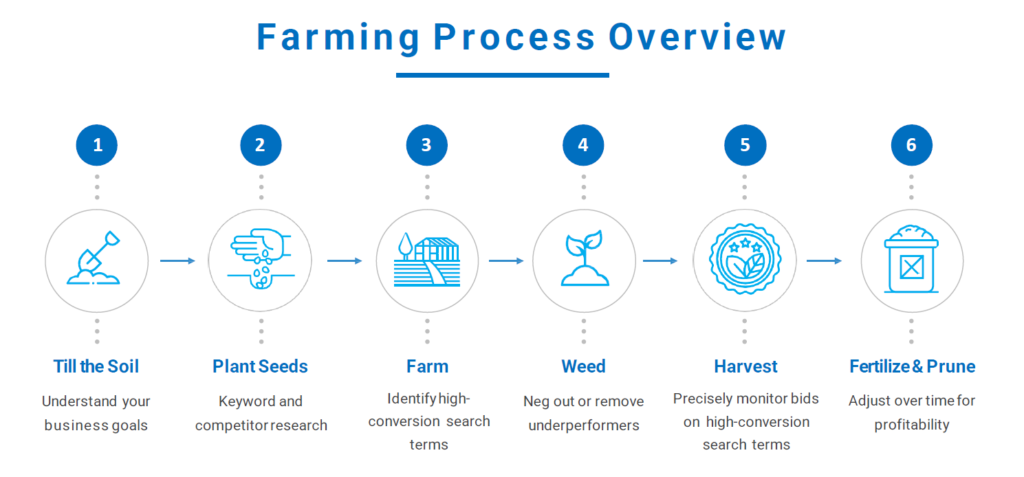
Or to summarize in one sentence…
Generate a huge list of keywords to put into broad match campaigns to help identify high-performing search terms and then move those into exact campaigns.
It’s simple but it’s a proven money-making machine.
Step 24: Setting Up Your First Campaigns
We recommend starting with the Sponsored Products ad type. Amazon offers several different advertising products but Sponsored Products will give you a great base of knowledge to grow from.
Check out our step-by-step guide on the technical process for setting up a sponsored products campaign.
Step 25: Don’t Forget About Negative Keywords
Negative keywords are essentially a way to tell Amazon where you don’t want your ads to appear.
If you’re not using negative keywords you’re basically just throwing away money.
You could even be hurting your organic ranking. Yikes!
Learn more about negative keywords in Amazon PPC and how to use them in our article.
Step 26: Pay Close Attention to Match Types
We recently did an experiment where we ran the same keyword in the same campaign.
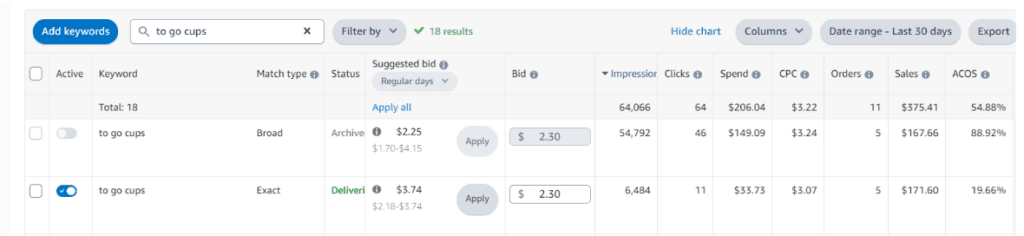
Just look at the difference in performance!
That’s why it’s so important that you understand the difference between the match types in Amazon PPC and how to best utilize them.
Step 27: Understand Your PPC Data
Once you’ve got your campaigns running, you’ll need to do some analysis to see if things are on track.
There are some important reports that you should understand as well as some Amazon PPC terminology you’ll want to familiarize yourself with.
Beyond that, the most important thing to remember is to clarify what you’re goals are with PPC. Without that, tracking your data won’t mean very much to you.
Step 28: Set Yourself Up For Long-Term Success With PPC
Remember that PPC on Amazon is not a race. It takes time to see growth and to build your presence on the platform.
We call this the PPC flywheel.
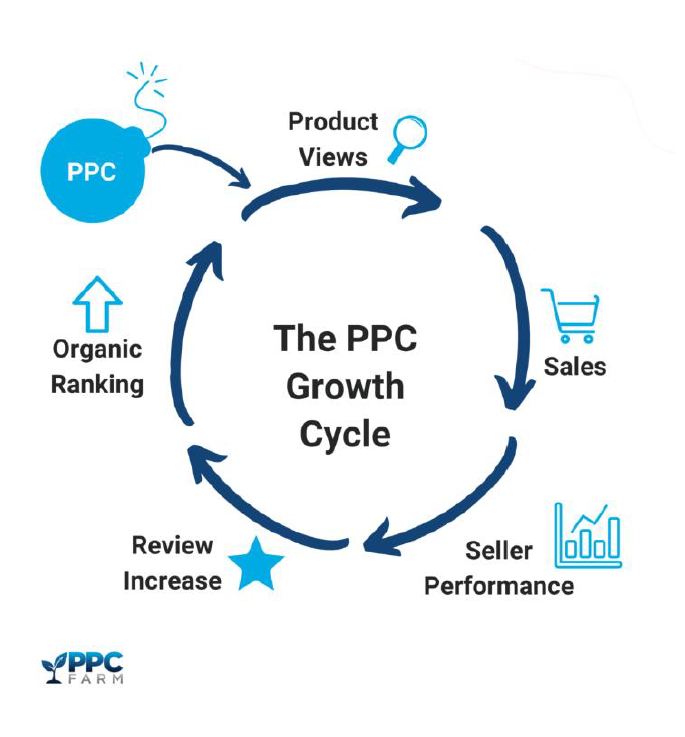
It’s what drives our entire philosophy about PPC. It’s the idea that eventually, your goal should be to reduce your reliance on PPC because you’re able to make tons of money organically.
It’s a bit of a catch-22 though since you’ll likely need to utilize PPC to kickstart the flywheel.
Try Out Some Amazon Promos
If you’ve done all of the above steps and you still aren’t seeing the results you want or maybe you just want to keep boosting your product even more, then you can consider trying out some of the promotional products that Amazon offers.
Step 29: Subscribe and Save
This is a great way to ensure you get repeat buyers. It’s especially effective if your product is something that people use regularly and need to replace often, like toothpaste or vitamins.
What is Amaozn subscribe and save?
Through this program, customers can enroll to automatically purchase a new product at a set time interval. Like every month or every two months.
It’s pretty much like getting free sales since you don’t have to do any work for these customers. They’ve already converted.
How do I set up subscribe and save for my Amazon store?
To set this up, go to https://sellercentral.amazon.com/sns/manage. From there, you’ll be able to select which product to enroll in as well as what kind of discount you’ll be offering in return for customer subscriptions.
Step 30: Coupons
The main goal of running coupons is to increase sales. But did you know that it can also help with your organic ranking even after the promotion is over?
Amazon looks favorably on products with a good conversion rate so anything you can do to boost your CVR is going to help with your organic ranking over time.
There are a few strategies you can consider when it comes to creating a coupon.
- Raising the product price and then use a coupon to get back to your original price. Sneaky? Yes. Effective. Oh yeah!
- If there are lots of sellers with a similar product, a coupon could be a way to differentiate yourself in the search results. Even as low as 5% off.
- Try using a coupon before or during a holiday to improve your product ranking during peak sales periods
How to set up a coupon on an Amazon store?
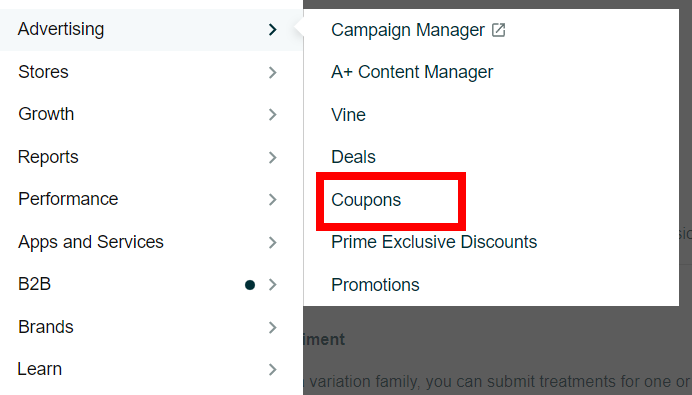
Under advertising in Seller Central, click on “Coupons” then click on “Create a New Coupon”.
After you select your product, you’ll have several options.

Don’t forget to set an end date! And be careful you’re not setting up multiple coupons or discounts on the same product because they will stack and you could end up losing money.
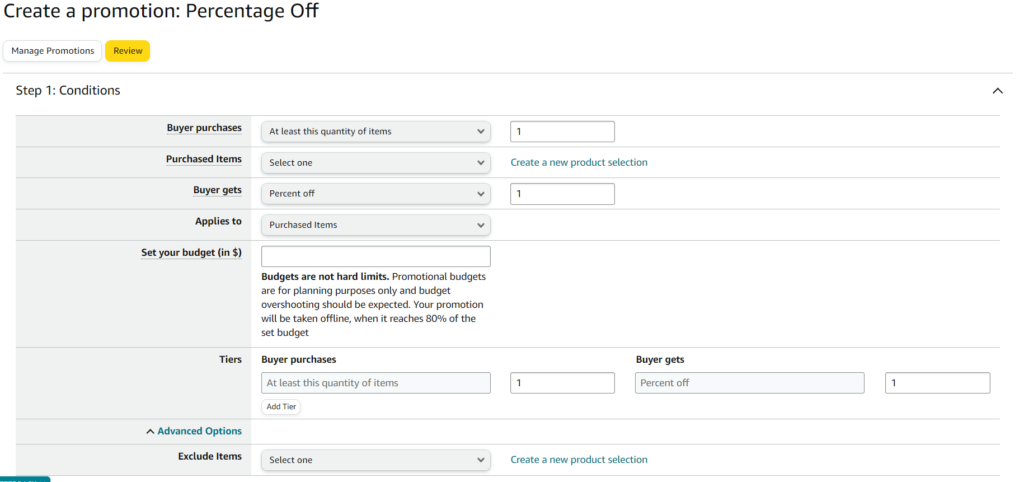
Step 31: Percent Off Sales and Tiered Discounts
This option is similar to coupons but just a slightly different way of presenting your discount.
With this option, you’re able to create buy one get X% off type of discounts.
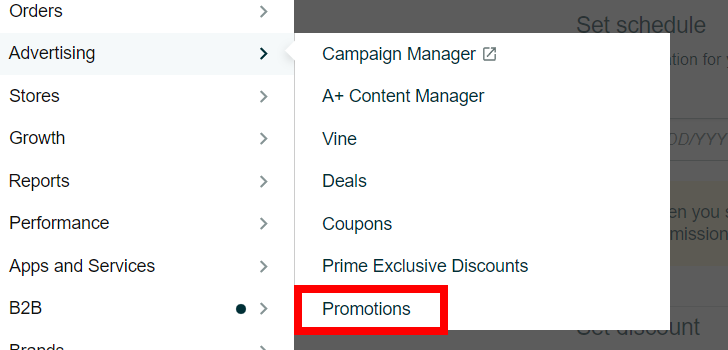
To do this, you’ll go to “Promotions”.
From there you’ll be able to select from the following options.
Step 32: Virtual Bundles
What are Amazon virtual bundles?
Virtual bundles allow you to sell 2-5 products together as a set. They will ship together but don’t need to be pre-packaged together.
They’re a great way to cross-promote products that go together and can help boost your sales.
To access virtual bundles, you’ll need to be brand registered. You can access it in your Seller Central under the “Brands” menu.
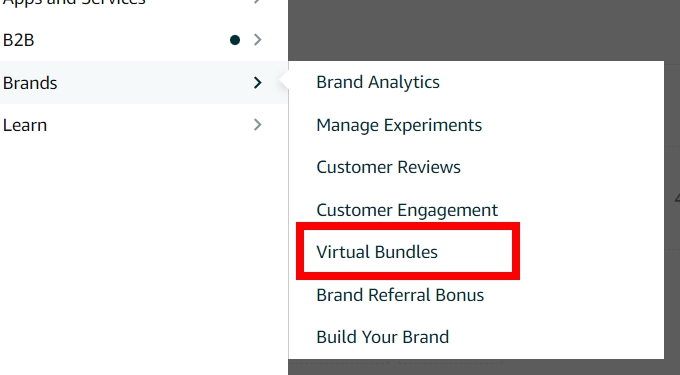
Then you’ll be guided through the setup process.
Keep in mind that when you create a virtual bundle you’re creating a new SKU. So you’ll be able to add new images, bullet points, and a new title.
Refer to steps 16-21 in this list for more info on optimizing your copywriting.
Finally, when it comes to inventory, the stock of your virtual bundle will be determined by the item in the bundle with the lowest quantity.
So if you’re bundling a necklace and earrings and you have 20 necklaces and 30 pairs of earrings in stock then your virtual bundle will have an inventory of 20.
Track Your Top SERPs
If you’re not tracking your progress, how will you know whether or not your efforts are paying off?
You might already be tracking things like sales and profit but what about your SERP ranking?
One of the most important things to track is your SERP ranking.
Why?
Your SERP ranking tells you how well your product is ranking organically.
Step 33: Understand: What Is a SERP?
SERP stands for Search Engine Result Page. Basically, it’s the list of results that come up after typing something into the search bar.
Here is the SERP for egg slicer.
When we talk about SERP ranking it refers to where your product is displayed within the list of results on a specific keyword.
Step 34: Create an Exhaustive List of SERPs
If you’re doing every step on this list, then you’ve already gone through this process when you did your keyword research before writing your product listing.
The idea here is that you want to identify every potential relevant keyword for your product.
The Brand Analytics tool in Amazon is a great (free) way to generate your list of relevant SERPs or check out our full keyword research post.
Step 35: Identify Top SERPs for Ranking
Of course you want to do your best to rank highly on as many SERPs as you can but realistically it’s best to focus on 2-3 so you can better prioritize.
Your top SERPs will…
- Be highly relevant to your product.
- Have a search volume of at least 1,000
- Probably in the top 650,000 in Brand Analytics
- Have enough available market share for you to take
A good gut check would be to to ask yourself whether not you would search this term if you were looking for a product like this. If your answer is no, that is probably a good indicator it isn’t the best SERP to prioritize.
So, how does this help you?
Knowing where you rank on your top SERPs is a great way to evaluate the health of a product. If you aren’t high up on key SERPs that means the product is likely not doing well as well as it could be.
Step 36: Are You Indexed Correctly?
If you’re not actually indexed for the relevant keywords that you’ve identified then it won’t matter how much money you spend on PPC or how perfect your product listing is because you won’t show up in the search results.
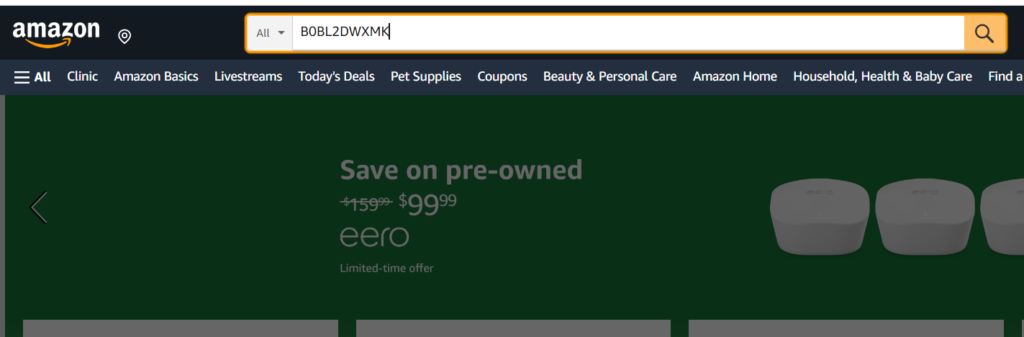
How can you check if your Amazon product is indexed?
A simple way to check is to type in your ASIN plus the keyword you want to Check into the Amazon search bar. For example, you would type in: B096XYPGY5 egg slicer.
If your product is in the search results, then you’re indexed. If not, then you will need to go back and make sure your keyword or phrase is in your listing exactly as it would be searched.
Meaning, if you want to rank for “egg slicer for parties” then you need to have that exact phrase in your listing copy.
Enhance Your Product Offering
Now that your listing and advertising are all up to snuff the next thing to tackle is going to be the product itself.
This section is all about how ways you can improve your product in order to improve customer satisfaction.
Step 37: Using AI to Read Amazon Reviews
At the time of this writing AI tools are taking off in a big way and the Amazon space is no exception.
One way Amazon sellers can utilize AI is when it comes to reading reviews. Either for their own product or a competitor’s product.
Knowing what customers are saying is vital to improving your product. For example, maybe lots of people are complaining about your product arriving damaged which helps you decide on new packaging to keep it safe.
Or maybe people are complaining that your product breaks easily in which case it might be time to talk to your supplier. Or even switch supplies.
We’ve got a full article on using Chat-GPT to create awesome Amazon product listings but there are lots of tools available out there.
Here are a couple to consider.
- Bezly is a Chrome extension that has both free and paid options.
- Shulex is another Chrome extension.
Step 38: Address Customer Complaints
Once you’ve read through all of the reviews for your product the next step is to do everything you can to address things that your customers aren’t happy about.
It’s really important to stay on top of negative reviews. If you get enough bad reviews then it will put your account health at risk and there’s a possibility your listing will be removed or that your entire account will be suspended.
So, make sure you’re paying attention to all of your reviews.
Step 39: Do You Need to Improve Your Packaging?
Maybe it’s not your product that’s the problem but the packaging it comes in. Even if your packaging is sturdy it might not be screaming “high-quality” to your customer.
It depends on your product of course but it’s important to be aware of what your packaging might be signaling to the customer.
If you’re selling expensive jewelry, for example, you probably wouldn’t ship it in a ziploc bag. You’d ship it in a fancy box to ensure that that customer feels like they’re getting a luxury product.
Consider talking with your vendor about what they have available.
Step 40: Consider a Variation/Multipack
Depending on the type of product you have your customers might be interested in a different variation or quantity.
For example, maybe you could sell your product in a different size or color.
Or if you’re selling your product in a pack size of one, maybe you could try selling a pack of three or 5 or even more.
Some things you can consider…
- If your customers are usually buying more than one of your item, then selling a multi-pack is probably a good idea.
- Look at your competitors. Are they selling a different color or size that you could also sell?
- Talk to your vendors. Maybe they can help you bundle your product into different sizes or they might have other variations that you can consider buying.
If you do increase your pack size, just remember to keep an eye on your inventory and the dimensions of your product since oversized items can have steep Amazon fees.
Step 41: Consider Complementary Product Bundles
This would mean actually physically packaging your product with another product to enhance its value. As opposed to virtual bundles which do not need to be physically packaged together.
For example, if you are selling sponges you could try selling them with a microfiber towel. Or if you sell trash cans you could sell them along with trash bags.
Even though the cost to you might not be that high the perceived value for the customer can be very high. Which means that you’ll be able to charge more for your product.
Not only that it can help you stand out from the competition if they’re not selling bundled products.
Step 42: Consider a Product Insert
Perhaps you’re getting negative customer reviews because your customers are actually using your product incorrectly. Adding an insert with instructions might help!
Addin an insert showcasing other products in your catalog might help you to increase sales and solidify your brand presence.
Or maybe instead of redoing your product packaging, you could add a small insert, like a business card or postcard, with a note to make your customers feel like they’re getting special attention.
The possibilities are endless and the extra cost of adding a small piece of paper is usually minimal.
Step 43: Consider a Free Gift
People love to get things for free even if it’s something small or something that they don’t actually want.

Here are a few ideas for things to add as a free gift to your product.
- Product samples
- A thank you card
- Coupons
- Small gifts like a luggage tag or badge
To really make it pop you could consider getting it printed with your brand name or logo.
Go the Extra Mile With A+ Content and Videos
In this final section, we will briefly touch on two ways to further enhance your product listing with A+ Content and product videos.
Step 44: Create A+ Content
What is Amazon A+ content?
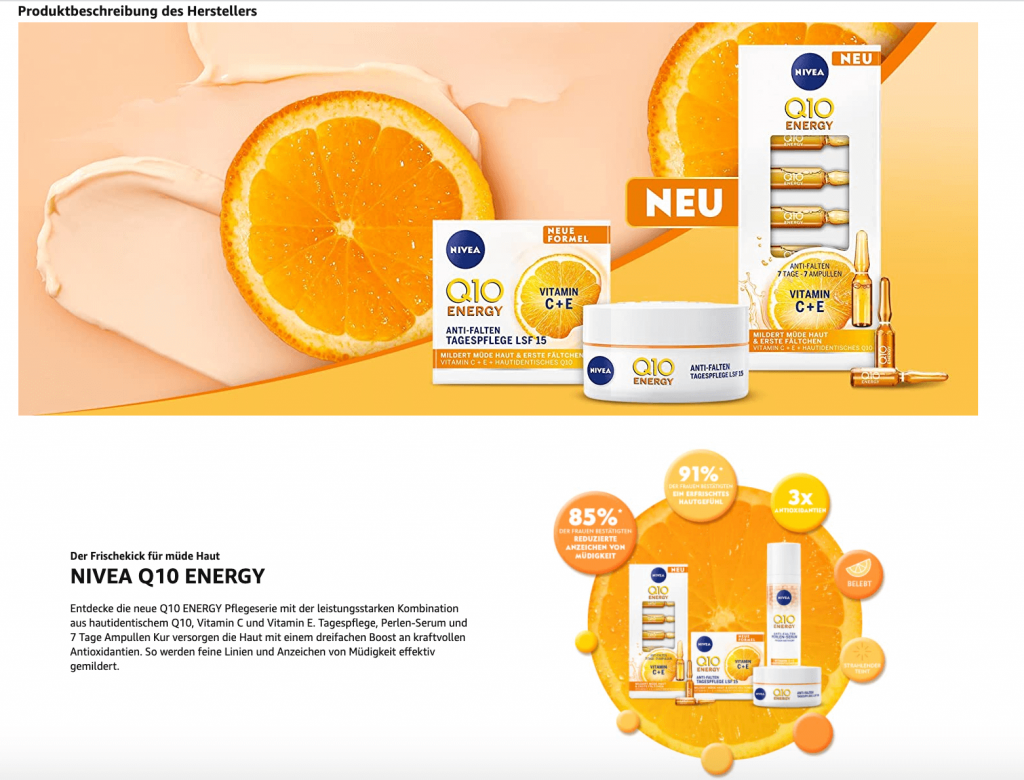
A+ content allows Amazon to add rich content, such as comparison charts, to the product detail page that showcases your brand and educates customers about product features.
Something like the image below. It kind of looks like a magazine ad.
Amazon offers a complete A+ content training guide in this PDF and you can access the platform by going to “A+ Content Manager” under the Advertising menu.

If you’re not skilled in graphic design or would just prefer someone else to handle it, it might be a good idea to look at websites like Fiverr or Upwork for freelancers that can help you out.
Step 45: Create a Product Video
Adding a video to your product detailed page could give you the edge you need to stand out in a crowded marketplace. Plus, people are much more likely to watch a video to get information than to read through your entire listing copy.
Who can use Amazon product videos?
You must be a brand-registered seller in order to add videos to your product detail page.
Here are some ideas for the kinds of product videos that do well on a Amazon.
- Highlight your product’s features and benefits
- Create a short explainer video showing how to use your product
- Make a comparison video showing why your product is better than the competition.
If you need more inspiration, take a look at what your competitors are doing and let that guide your concept idea.
You might be thinking, I’m not a videographer, so how can I get a good video?
Again you might consider looking to Fiverr or Upwork for help from a freelancer. Otherwise, there are agencies out there that specialize in making product videos for Amazon.
What’s Next?
If you’ve gone through this entire checklist, the only left will be to sit back, relax and watch those sales come rolling in.
But don’t get complacent! The marketplace is continually changing, and you’ll want to revisit this checklist every 3-6 months to make sure that your listing is as optimized as possible.
Is there anything we missed on our checklist that you do to get your listings in tip-top shape?
Did anything in this article spark your curiosity or bring up a question? Comment below or email us at Howdy@PPCFarm.com. We love talking about PPC!
